Flashing Cisco AP to autonomous mode
Prerequisites
- USB to serial converter
- Installation of Tera Term
- Cisco IOS firmware file (Requires log-in) (More firmwares here (public. dead link :( you're on your own))
Flashing
Boot the AP to recovery mode and get root access
- Plug in the USB to serial converter to the PC and the AP.
- Run Tera Term and open the appropriate COM port
- Hold reset/mode for 20 seconds or until the LED turns red. Release.
- You should now see a prompt which looks like
ap:. - Run the following commands:
del flash:private-multiple-fsdel flash:env_vars
This will reset the AP to factory defaults - Type
resetand answer yes to reboot the AP to regular system
Remove previous firmware
When the AP has booted to it's current firmware you can type the default username Cisco and password Cisco. After logging in type enable to get a proper shell. Once again the password is Cisco.
To set up the shell to allow debug commands run the following:
debug capwap console cli
debug capwap client no-reload
To erase the filesystem and completely reset the firmware, type the following commanderase flash:.
This will take around 5 minutes to complete, and the AP might spit out log messages sporadically.
Afterwards restart the AP. It will boot to recovery mode, because there is no firmware.
Flash the new firmware
Transfer file from PC to AP
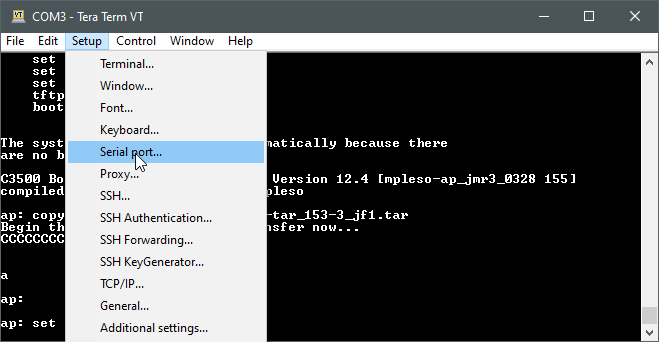
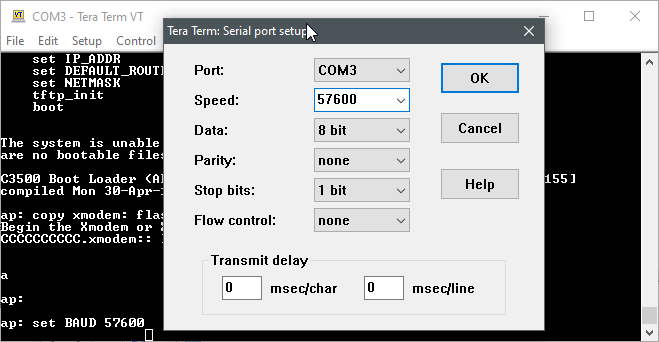
First, to speed up the transfer you need to set a higher speed on the COM port.
set BAUD 57600In Tera-Term set the speed on the COM port.
Type the following command:
copy xmodem: flash:ap3g1-k9w7-tar_153-3_jf1.tarIf you use a different firmware file, change the filename.
In Tera Term open the following menu:
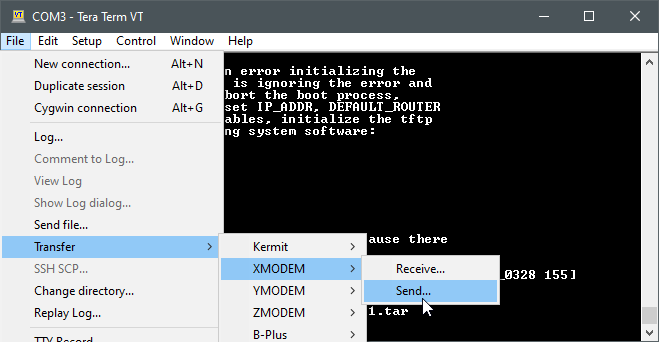
and select your firmware file. You can check the 1K transfer option for a slight additional speedup. This will take a long time.
When the transfer is complete, set the speed back to 9600 using the instructions above with 9600 instead of 57600.
Extracting(/installing) the firmware file
Type the following command to extract the firmware file.
tar -xtract flash:ap3g1-k9w7-tar_153-3_jf1.tar flash:If you use a different firmware file, change the filename.
After extraction has finished you can reboot the AP with command reset.
After reboot has completed you will see a message like:
*Mar 1 00:00:32.976: %DHCP-6-ADDRESS_ASSIGN: Interface BVI1 assigned DHCP address 128.39.204.157, mask 255.255.252.0, hostname apYou can enter the assigned IP address in your web browser to access the web interface. The default username is Cisco with password Cisco.
No Comments