Fixing lake-elevation data with OSM and heightmaps
Prerequisites
- Qgis 3
- QuickOSM plugin for Qgis 3
- Downloaded heightmap of the area in DEM format
- MSFS Developer mode enabled
- Some basic knowledge of the MSFS SDK (even though I will repeat a lot of the documentation in this document)
- MSFS-attribonly shapefile
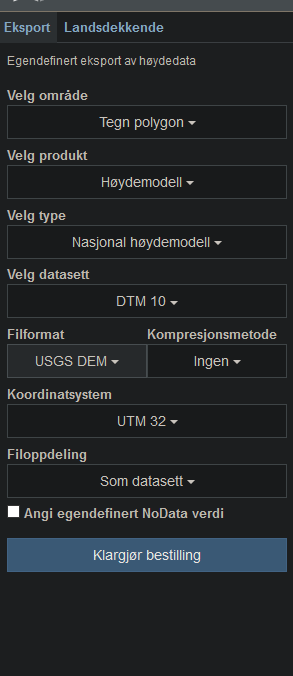
For Norway: hoydedata.no with the following settings:
Preparations
Preparing project structure
- Open MSFS with developer mode enabled and start a flight in the area you wish to fix. For this example I will use Ålesund
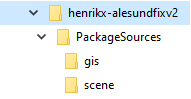
- While it is loading, create a folder in the following format:
<author>-<projectname>. This will be your project root. - Inside the project root create a folder called "PackageSources" with the two subfolders "gis" and "scene". Your structure should look like below:
- When MSFS has loaded, create a new project
- Click the [Dev-Mode] button on the toolbar
- Select new project
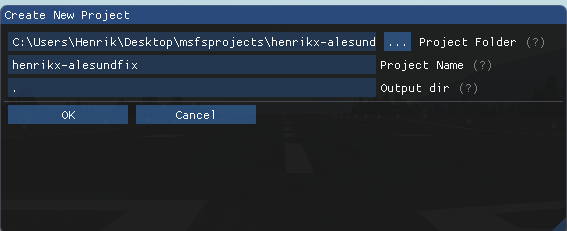
- In the dialog box type the name as the folder name you made earlier. Also select the project directory (the directory you created earlier) as the project root. Output dir does not have to be changed
-
-
- Once created, click the + button to add a placeholder package, which will contain the scenery fixes.
- Package Name should be the same as your project-name
- Type should be BGL
- When you've added the package, you will be able to edit some details about it. Type in various details, such as Thumbnail, Content-Type and Title
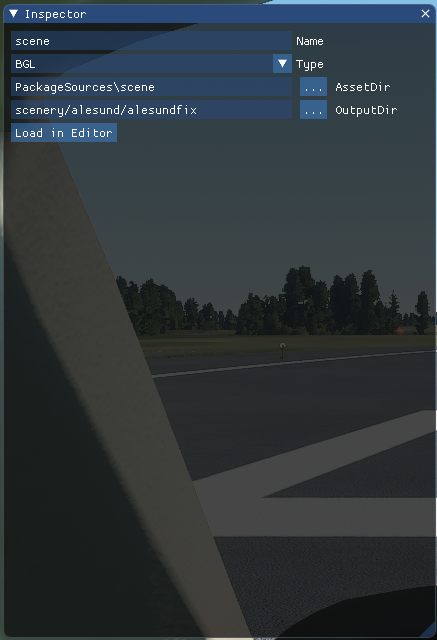
- Click the edit button next to the asset-group. The name should be changed into "scene". Asset dir should be set to
PackageSources\scene - Output dir refers to where the sim will load the addon into it's internal memory (Virtual File System). For sceneries, this must be inside
scenery/. You should, however add a few subdirectories. I like this format:scenery/<area-name>/<package-name>.
- Once created, click the + button to add a placeholder package, which will contain the scenery fixes.
-
-
- Click the "Load in Editor" button.
- Add a completed Polygon. It does not matter where or what, because we will overwrite it later anyways.
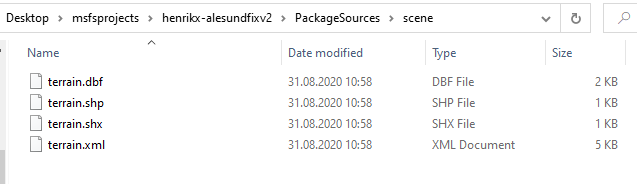
- Click "Save Scenery". The Scenery Editor will ask you where to save it. Select
<project-root>/PackageSources/scene/terrain. - You should now see the below generated files in the directory
-
- Save the project.
Creating the scenery
- Open Qgis
- Once in Qgis, create a new project. Save the project as
<project-root/PackageSources/gis/gis.qgz(You may of course change the name to whatever you like). This directory will be your GIS project folder. This is where you should save all your layers. - Copy the heightmaps you downloaded to this directory for easy access.
Add and filter geodata
Preparing heightmaps
- Import the heightmaps by clicking
Layer > Add Layer > Add Raster Layer...Then select the heightmaps and click "Add". - (if you have more than one heightmap) Merge the rasters by clicking
Raster > Miscellaneous > Merge. Select the layers and click Merge. You should now remove the split files from the project. - Save the merged heightmap by
Right Clicking the Layer > Export > Save as...Save it in your project directory as a GeoTIFF. Select the CRS epsg:4326 - wgs84. Give it any name you like, but I will be calling itwgs84heightmap. Remove the temporary Merged layer.
Automatic method
After you have imported and merged your heightmap, I have developed a method to do all the manual steps found below automatically using a QGIS Model.
First download this model file: https://docs.takset.net/attachments/4
To use it, open Processing > Graphical Modeler. Open  the file you downloaded. When it is open you can click the Run
 button. Select the merged heightmap and click Run again. It will run through all the steps for you. Unless you changed it's name in the parameters window (the window where you selected your heightmap), the layer to export (see Export scenery sources) will be called
 msfs-scenery.
Manual method
Preparing OSM water-polygons
- Download water-lake-data with QuickOSM. To do this click
Vector > QuickOSM > QuickOSM...Use Keynaturaland Valuewater. Select "Layer Extent" and then select the saved heightmap. - Remove all the imported layers except the Vector Multi-Poly layer
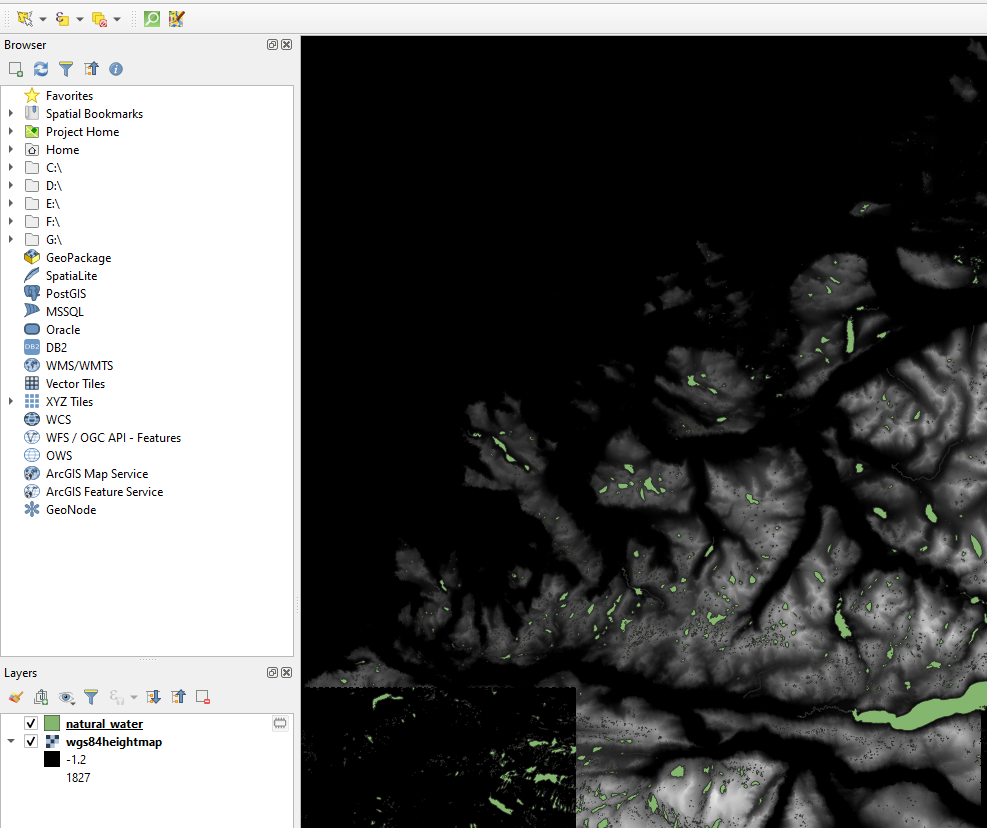
- Your map should now look something like this:
- We're now at a stage where we have the polygons for all the lakes in the area and the height data at those lakes, but we need to filter out some polygons that are not applicable and will mess things up in the future.
- Duplicate the
natural_waterlayer, so that we can always go back. You can call the duplicated layer "data". - Select the "data" layer and go to
Edit > Select > Select by Expression.... - For the expression type
raster_value('layername',1,make_point(x($geometry),y($geometry))) = 0- Replace the
'layername'argument by selecting that text and double clickingMap Layers > wgs84heightmap(or whatever you called it). ClickSelect Featues. - Click the Edit
 button to allow editing the layer
 - You will now have all polygons where the heightmap is black selected. Delete all those by clicking the Delete button
 .
. - We must now delete all the polygons which is outside of the heightmap-area. To do this change the
= 0part of the expression tois nulland repeat the previous step. - We must now remove all the rivers. Flattening rivers might lead to some interesting results...
- Go to
Edit > Select > Select Features by Value.... In thewaterfield type "river". Then repeat the deletion step. - Click the Edit button again to stop editing and answer yes to save.
- Your map should now look like this: (Notice how the lakes outside of the heightmap area has been removed.)


- Save the data by
Right Clicking the Layer > Export > Save Features as.... Select ESRI Shapefile and call it "data" (once again call it whatever you like). After saving, remove the temporary layer, so that you only have the saved layer open. This save operation also fixes a few compatibility issues with the OSM data, therefore it is important. - Usually the terrain is also broken a few meters around the lakes, so we need to increase the size of all the polygons a little bit. We can do this by using "Buffer". Select the "data" layer. Go to
Vector > Geoprocessing Tools > Buffer.... For distance, I've found a good value to be0,0006. All other values can be set to default, as the accuracy is not that important.
Adding height data
- Next, we need to add the height data to the polygons. We can do this with the "Set Z value" algorithm. To find it, you need to enable the "Processing Toolbox". Do this by clicking
View > Panels > Processing Toolbox. Next click the following:
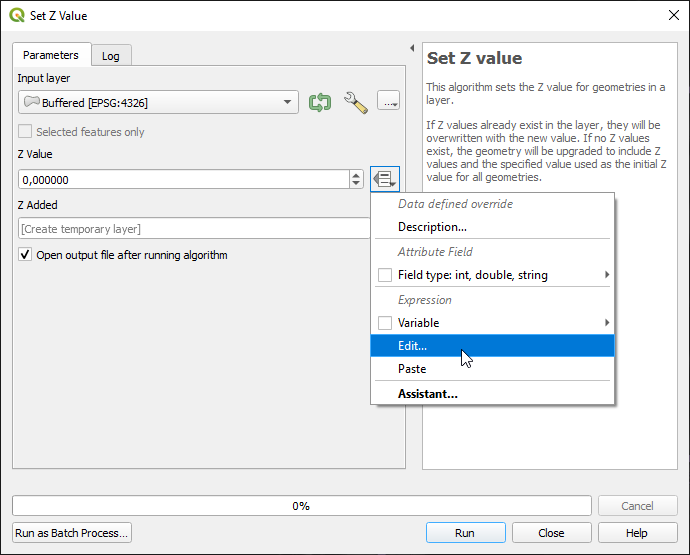
- In the expression box, type
raster_value('layername',1,make_point(x($geometry),y($geometry)))- Once again, replace the
'layername'argument by selecting that text and double clickingMap Layers > wgs84heightmap(or whatever you called it). Then clickOkand thenRun.
Adding MSFS SDK Data
- The proper data needs to be added, so that MSFS knows what to do with all these polygons.
- To do this we must first set the correct fields to the layer. Right click
Z Addedand selectProperties. In this window selectFields. Click the Edit button, then press CTRL+Aand then Delete Field button to remove all the fields added by OSM. Remember to uncheck the Edit button, to save the changes to the layer.
 - Import the msfsattronly shapefile, by clicking
Layer > Add > Add Vector Layer.... This file contains only the field structure of an MSFS scenery source shapefile. - What we need to do is merge this layer with the layer containing our polygons. That will automatically put all the required fields into our polygons layer. To do this click
Vector > Data Management Tools > Merge Vector Layers.... Click the...button next to theInput Layersbox. Select the importedmsfsattribonlylayer and theZ Addedlayer. After running it, you will get a layer calledMerged. - Select the
Mergedlayer, and then open the Attribute Table The table looks like this


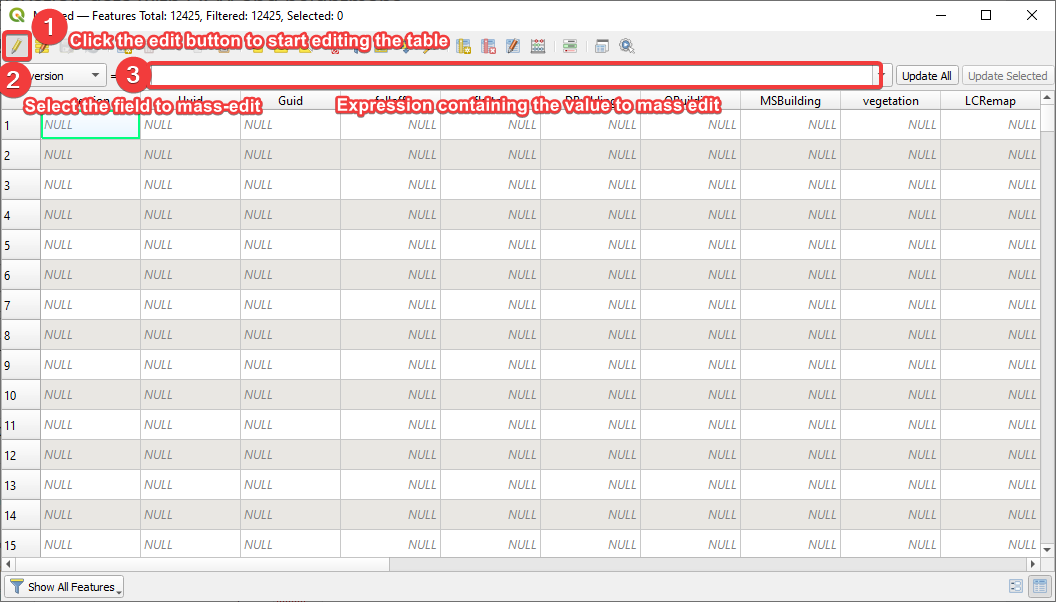
- This is where we tell MSFS SDK what to do with the polygons. Below is a table which will explain which expressions you should use for each field. Press the
Update Allbutton to apply the expression to the field.
| Field | Expression | Comment |
| version | '0.2.5' | |
| Uuid | uuid() | Generates an unique Uuid for all features. |
| Guid | '{00000000-0000-0000-0000-000000000000}' | Not sure what this does. Seems redundant, but might be left in for compatibility purposes. |
| falloff | 200 | This is the amount of smoothing MSFS will do around the flattening. 200 is the default and it is a good-value, but you can experiment with this. |
| flatten | 1 | This tells MSFS SDK to flatten the terrain inside the polygon. This is what ultimately does the terraforming. |
| DBuilding | 0 | |
| OBuilding | 0 | |
| MSBuilding | 0 | |
| vegetation | -1 | |
| LCRemap | 0 | |
| Material | '{00000000-0000-0000-0000-000000000000}' | |
| ExcludeTIN | 0 | |
| BuildTIN | 0 | |
| Detected | 0 | |
| VegDensity | -1 | |
| Layer | 0 | |
| VegFalloff | 0 | |
| IsWater | 0 | |
| WaterExcl | 0 | |
| WaterType | 5 | |
| AirprtSize | 0 | |
| EcoRegion | -1 | |
| NaturalVeg | -1 | |
| Intrntionl | 0 | |
| Artificial | 0 | |
| Brightness | 127 |
- Click the Remove field
 button and remove the
 pathfield. - Uncheck the Edit button to save the changes.

Exporting the scenery sources
- The last step is to export this data into MSFS scenery source file. To do this right click the final
Mergedlayer and selectExport > Save Features As.... Save the name asterrainin thegisfolder. Leave everything else as default. - Now you can take the
terrain-files it saved and overwrite theterrain-files in thescenefolder.
Verifying that it works
- Next we need to attempt to load this scenery into the scenery editor. To do this, first, open the area in the simulator. Click
[DevMode] > Open Project...and select the project.xmlfile you saved earlier. - Next, in the Project Editor, select the
sceneasset. - Click
Load in Editor. - This will load all the polygons. Depending on how big the area is, this might lag a lot!
Building the scenery
- Next, we need to build the scenery into a package that can be loaded.
- To do this, select the asset group above
scenein the Project Editor. - In the Inspector Window click
Build Package. - You will now have a ready-to-use package in the
<project-root>/Packagesfolder. This folder can be moved to the simulator'sCommunityfolder, for the simulator to load.
No Comments